The Italian Tubular Bind Off is one of those finishing techniques that genuinely changes the way your knitting looks, and once you learn it, you’ll wonder how you ever used anything else. It’s specifically designed for 1×1 ribbing, creating a stretchy, rounded edge that looks polished and intentional. Professional, even. Like you bought your sweater at a store (the good kind of store).
The catch? Most tutorials present it as a 4-step sequence, and keeping track of where you are in that sequence while also managing a tapestry needle and a wiggly piece of knitting is… a lot. (Ask me how I know.) What finally made this technique click for me was reframing those four steps as two repeating pairs. That small mental shift made all the difference, and I haven’t looked back since.
If you’ve been avoiding this bind off because it seemed too fiddly to bother with, this is the tutorial that will change your mind.
Table of Contents
Before You Begin: Don’t Skip the Tubular Row
Before you touch your tapestry needle, you need to work a tubular row to prepare your ribbing. This is a non-negotiable step — skipping it will result in a tighter, stiffer edge that defeats the whole purpose of using this bind off in the first place. (I have skipped it. The results were not cute.)
The tubular row essentially separates your knit and purl stitches into two “layers,” giving the sewn bind off the structure it needs to create that signature rounded, stretchy edge.
Tubular Row Instructions
Note: These two rows align your stitches in a way that supports the sewn bind off. It only takes a minute and makes a big difference. (Ask me how I know…)
Tubular Row in the Round
- Row 1a: (Knit 1, slip 1 with yarn in front) repeat to end.
- Row 1b: (Slip 1 with yarn in back, Purl 1) repeat to end.
Tubular Row Worked Flat
- Row 1a: (Knit 1, slip 1 with yarn in front) repeat to end. Turn.
- Row 1b: (Slip 1 with yarn in front, Knit 1) repeat to end.
Sewn Italian Bind Off: The Simplified 2-Step Method
Now you’re ready to begin. This is a sewn bind off, meaning you’ll set down your knitting needles and work entirely with a tapestry needle from here. Think of this as a very fancy way to weave in your ends.
A note on tension before you start: every stitch below is made by inserting the needle and pulling the yarn through. You want the tension firm enough to look tidy, but not so tights that you lose the stretch. If your bind off feels stiff when you’re done, it was probably too tight. Unfortunately, this is one of those techniques where undoing it is genuinely painful. Practice on a swatch first if this is your first time. Seriously.
- Cut your yarn to a length about 3 times the width of the edge are binding off and thread it onto a tapestry needle.
Set-Up Step
- Insert your tapestry needle into the first stitch (a knit stitch) as if to purl. Don’t remove the stitch.
Step 1: Work the Knit Stitch Pair
- Insert needle into the second stitch (a purl stitch) from behind as if to knit.
- Then into the first stitch (a knit stitch) as if to knit, and remove it.
Step 2: Work the Purl Stitch Pair
- Insert needle into the second stitch (a knit stitch) as if to purl.
- Then into the first stitch (a purl stitch) as if to purl, and remove it.
Repeat
- Keep alternating Step 1 and Step 2 until one stitch remains (a purl stitch).
- Insert your needle as if to purl, then remove the stitch.
That’s the whole rhythm. Knit pair, purl pair, repeat. Once it clicks, it really does become almost meditative.
Finishing Touches
Now it’s time to weave in your ends. This step matters more than people think. A sloppy end can undo the clean look you just worked so hard to create. If you worked in the round, use your yarn tail to close the gap between the first and last stitch when weaving in. For some techniques on properly weaving in ends, check out Knitters Don’t Like to Weave in Ends — But We Must.
An Even Further Simplified version
Here’s the full process condensed into as few words as possible — great for saving to your phone or pinning next to your project until the rhythm becomes second nature.
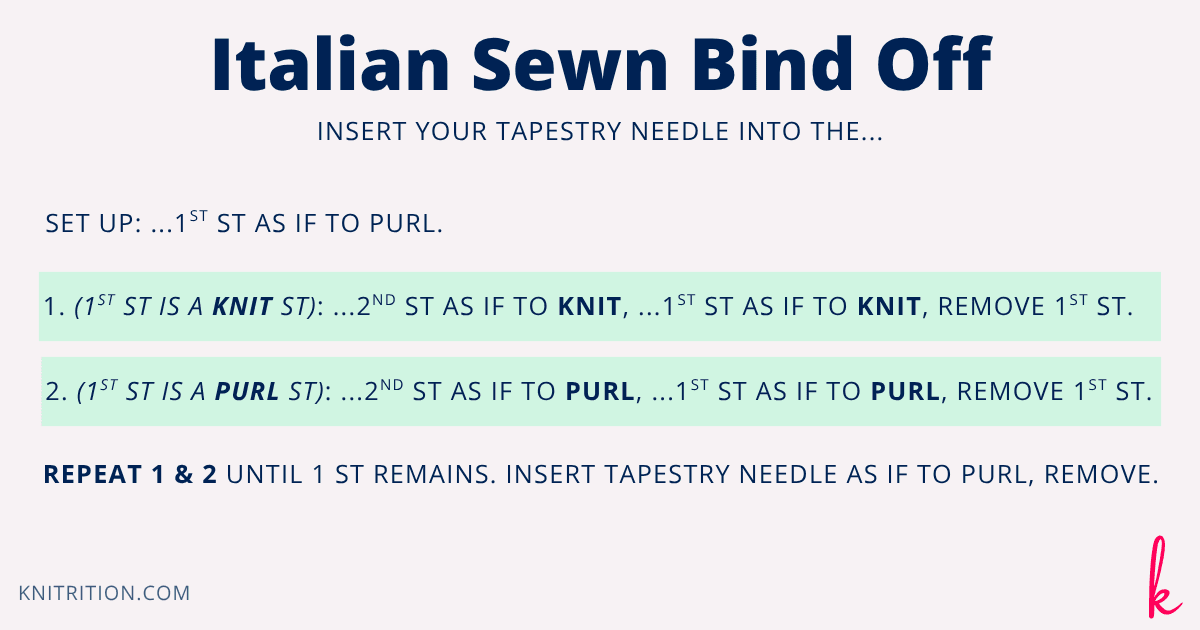
Insert your tapestry needle into the…
Set up: …first stitch (a knit stitch) as if to purl.
- …second stitch (a purl stitch) from behind as if to knit; …first stitch (a knit stitch) as if to knit; remove the first stitch.
- …second stitch (a knit stitch) as if to purl; …first stitch (a purl stitch) as if to purl; remove the first stitch.
Repeat steps 1 and 2 until one stitch remains (a purl stitch). Insert your tapestry needle as if to purl, and remove the stitch.
Save This Graphic
I made a simple visual to help you remember the steps. Save it to your phone, Pinterest, or wherever you keep your knitting resources. Before long, you won’t need it anymore—you’ll know it by heart.
A demonstration
The “insert from behind as if to knit” move is genuinely awkward the first time. It feels backwards, and your instinct will be to second-guess yourself constantly. A video helps enormously here, so here’s a demonstration from Brooklyn Tweed if you need it.
Final Thoughts: Why I always Use This Bind Off Now
Once you’ve got the rhythm down, this becomes your default bind off for any 1×1 ribbed edge: hats, sock cuffs, sweater necklines, cuffs, you name it. The result is just so much better than a standard bind off that it’s hard to go back. It gives your finished projects that “wait, did you make that?” quality that makes all the hours of knitting worth it.
It takes a little patience to learn, but this is one of those skills that pays for itself every single time you use it. Try it once, and I think you’ll be as converted as I am.
Looking for your next technique to master? Check out Marling in Knitting: The Ultimate Guide to Blending Yarn Colors or browse all the Purls of Wisdom for more tips like this one.